

Best Stage Monitors for Clear Live Sound
The best stage monitors for most small and midsize gigs are powered 10- or 12-inch wedges with at least 300 watts of advertised peak power, a balanced XLR input, and a clear way to control level and EQ. Choose a 10-inch model when space and feedback control matter most; choose a 12-inch model for fuller low-mid support or louder stages. Passive wedges make more sense when a venue already has suitable amplifiers and a technician to manage them.
Powered vs. passive: the practical difference
A powered monitor has its amplifier built in, so you run a line-level signal from the mixer to the speaker and provide mains power at the wedge. That reduces rack gear and simplifies one-off setups. Check whether its quoted wattage is peak or continuous (RMS); peak figures are larger and should not be used to compare sustained output directly.
Our top picks
 Behringer EUROLIVE F1220D Bi-Amped 250 Watt Monitor
- Feedback Filter (each)
- Adjustable feedback filter and integrated limiter for ultimate…
- Revolutionary Class-D amplifier technology: enormous power, incredible sonic…
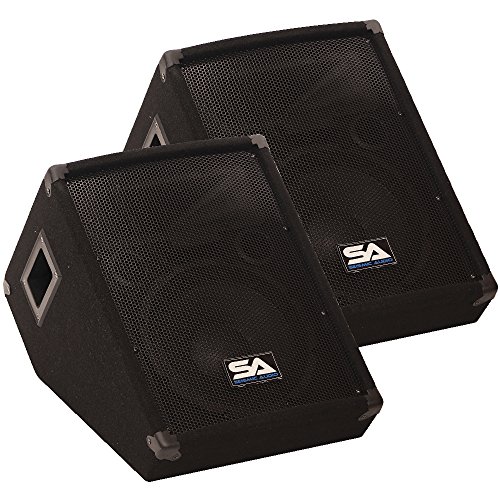 Seismic Audio
- Model #: SA-10MT (Set of 2)
- 2-way 10inch Speaker
- 150 Watts RMS
 Yamaha BR12M 12-inch 2-Way Floor Monitor
- 12" high power woofer
- 1" compression driver with 90x40 CD horn
- 300 W program / 600W peak power handling
| Product | Key specs | |
|---|---|---|
| Behringer EUROLIVE F1220D Bi-Amped 250 Watt Monitor | Feedback Filter (each) Adjustable feedback filter and integrated limiter for ultimate… Revolutionary Class-D amplifier technology: enormous power, incredible sonic… | Check price |
| Seismic Audio | Model #: SA-10MT (Set of 2) 2-way 10inch Speaker 150 Watts RMS | Check price |
| Yamaha BR12M 12-inch 2-Way Floor Monitor | 12" high power woofer 1" compression driver with 90x40 CD horn 300 W program / 600W peak power handling | Check price |
 Behringer EUROLIVE F1320D Active 300 Watt 2-Way Behringer EUROLIVE F1320D Active 300 Watt 2-Way | High-power 300-Watt 2-way monitor speaker system for live… Exceptional sound quality, wide frequency bandwidth and dynamic… Revolutionary Class-D amplifier technology: enormous power, incredible sonic… | Check price |
As an Amazon Associate we earn from qualifying purchases at no extra cost to you.
A passive monitor needs a speaker-level connection from an external amplifier. This adds equipment and setup steps, but can be economical for venues with an installed amp rack, several wedges, and staff who understand impedance and amplifier matching. Never connect a passive speaker output to a powered monitor’s input.
| Monitor type or example | Woofer | Amplification / power figure | Useful connection details | Best fit |
|---|---|---|---|---|
| Yamaha DBR10 powered | 10 in | 700 W published dynamic figure | XLR/TRS combo input; XLR output | Compact stages, speech, vocals, and moderate band levels |
| QSC CP12 powered | 12 in | 1,000 W published peak figure | XLR/TRS combo inputs; XLR output | General-purpose wedge where a compact cabinet is preferred |
| JBL EON712 powered | 12 in | 1,300 W published peak figure | Combo inputs, XLR output, onboard DSP and Bluetooth control features | Flexible small- to midsize rigs needing onboard processing |
| Yamaha CBR12 passive | 12 in | 500 W published program rating | Speaker-level input; requires an external amplifier | Installed systems or rigs with a matched amp and cabling |
Manufacturers use different rating methods, so these wattage figures are not apples-to-apples measures of loudness. Maximum SPL, sensitivity, limiter behavior, and how cleanly the speaker handles peaks matter too. Confirm the exact revision and specifications before buying.
Choose by venue and stage conditions
- Rehearsal room, café, or quiet acoustic set: A powered 8- or 10-inch wedge may be enough for vocals and keys. Smaller cabinets take less floor space and can be easier to position away from microphones.
- Club stage with a full band: Start with a powered 10- or 12-inch model. A 12-inch woofer generally gives more low-mid weight for keys or a bass-heavy monitor mix, but it does not automatically play louder or resist feedback better.
- Loud stage or drummer-heavy mix: Favor a monitor with higher maximum SPL, robust limiting, and a horn pattern that suits the player’s position. Use more wedges or personal monitoring rather than pushing one speaker into audible distortion.
- House of worship, school, or venue with installed equipment: Passive wedges can reduce duplicated amplifiers if the existing system is properly matched. For rotating volunteer crews, powered boxes may be easier to troubleshoot individually.
As a rough planning example, a 300-person room does not automatically require a particular wattage. The monitor serves the performer, not the whole audience. The useful question is whether the performer can hear the needed vocal or instrument clearly over stage noise without excessive level.
What the specifications mean in use
Woofer size and cabinet shape
Eight- and 10-inch wedges are easier to fit in crowded stages and usually have less deep-bass output than larger models. Twelve-inch designs are versatile for vocals plus instruments with substantial low-mid energy. A 15-inch wedge can supply more low-frequency body, but is heavier and can encourage a louder, boomier mix. For kick drum or bass guitar, a subwoofer or in-ear system may be a better solution than asking a floor wedge to reproduce deep bass at high volume.
Dispersion and listening position
Dispersion describes how widely the horn spreads high frequencies. A broad pattern can cover a singer who moves around the wedge; a narrower pattern can focus sound on a stationary player and reduce spill toward nearby microphones. Check the manufacturer’s horizontal and vertical coverage angles, then orient the cabinet so its intended coverage reaches the performer’s ears. Wedge angle and driver layout also affect coverage, so the horn figure alone is not the whole story.
Connectivity and control
For most powered wedges, an XLR or combo input is the practical minimum. An XLR thru output can pass the mixer feed to another speaker, but it is not necessarily a separate monitor mix. Bluetooth is useful for playback or setup control on some models; it is not a substitute for a reliable wired monitor feed. Built-in EQ, high-pass filters, and feedback-control features can help, but they cannot fix poor microphone placement or an overly loud stage.
Reduce feedback before turning up
Feedback happens when sound from a monitor re-enters a microphone and is reinforced by the system. No speaker is immune. A well-designed wedge can help through controlled dispersion, predictable response, and onboard processing, but placement and mixing usually make the larger difference.
- Put the wedge in the microphone’s rejection zone. For a typical cardioid vocal microphone, that is often behind the microphone; supercardioid patterns have different rear pickup behavior, so check the microphone’s polar pattern.
- Aim the wedge at the performer’s ears. Tilting or repositioning it can improve clarity without adding level. Keep it out of the microphone’s strongest pickup area.
- Start with only what the performer needs. Excess instruments in the vocal wedge raise the chance of feedback and muddy the mix. Use a high-pass filter on vocal channels where appropriate.
- Increase level gradually and ring out the system carefully. If a narrow frequency starts to ring, a sound engineer can make a modest, targeted EQ cut. Large, repeated cuts reduce clarity and headroom.
Buying and ownership checks
For a powered monitor, confirm the mains voltage, power-cable arrangement, input controls, limiter indicators, and whether the cabinet has a pole socket or wedge-specific angle you will actually use. For a passive model, match the amplifier’s output to the speaker’s impedance and continuous power rating; leave headroom and avoid clipping. If the venue uses long cable runs, use suitable speaker cable for passive speakers, not thin instrument cable.
Budget roughly $200–$400 for many entry-level powered wedges, $400–$800 for more capable compact or midrange options, and more for premium output, advanced DSP, or touring-grade construction. Passive cabinets may cost less individually, but include the amplifier and cabling in the system total.
Transport and upkeep matter. Handles, grille condition, connector strain, and cabinet corners are common wear points. Keep vents clear, coil cables without sharp kinks, and secure power and signal leads so performers cannot trip over them. Before a show, inspect the grille and connectors and test each wedge at a moderate level. A rattling grille, intermittent input, or repeated limiter activity is a reason to investigate—not to compensate by turning the system up.
Quick decision guide
| Your situation | Practical starting choice | Why |
|---|---|---|
| Limited budget, occasional solo gigs | Powered 10-inch wedge | One box avoids an amp purchase and keeps transport manageable |
| Regular band gigs, room for a larger wedge | Powered 12-inch wedge with DSP | More flexible mix capacity and onboard tuning options |
| Venue already owns amplifiers and cabling | Matched passive 12-inch wedges | Uses existing infrastructure and can simplify a multi-wedge installation |
| Very loud stage or difficult feedback | Higher-SPL wedge, repositioned carefully; consider in-ears | More output alone may not solve spill or microphone coupling |
For a first purchase, a powered 10-inch wedge is the space-saving choice, while a powered 12-inch model is the safer all-rounder for varied band mixes. Pick passive only when the amplifier, matching, and operating expertise are already part of the system.





Write Your Review
No reviews yet. Be the first to share your experience!